
Deep Linking in FlutterFlow: A Complete Guide


Published on September 16th, 2025
Deep linking is conceptually very simple.
You receive a link on the web, say, for example, because someone has used the share button in a mobile application to generate it, and when you tap it, the app opens on your phone and it navigates to the correct page using the correct parameters.
But this very simple concept became incredibly overcomplicated when FlutterFlow's existing solution, which was Firebase Dynamic Links, was retired. Now in the FlutterFlow community, you'll hear a lot of references to the new, sort-of "official-ish" replacement for Dynamic Links, which is to use BranchIO. But the community generally found that BranchIO was proving to be confusing, brittle, and seemed to be prone to hidden costs.
Ultimately however, the reason that Firebase Dynamic Links was retired was because the tooling had advanced in the space so much that actually, deep links these days are pretty straightforward. In this article, I'll give you the no-frills, simple, and free way to implement deep links in your FlutterFlow app – without Branch.io or any other third-party service.
Flutter to the rescue
The first port of call is to visit this page:
https://docs.flutter.dev/ui/navigation/deep-linking
This article will more or less follow this guide, but with a FlutterFlow focus and a practical means of deploying the necessary code.
Hosting the Configuration files
The way that deep links work is that the link resolves to a web page online, and that webpage contains configuration files that the deep links know how to interpret. Since you're probably already using Firebase (say, for authentication, or push notifications) in your FlutterFlow app, Firebase hosting is the simplest way to go. However, you can host these files for free with any web hosting server you like, such as Netlify or Vercel.
Open a terminal, ask your favourite AI to install the firebase CLI for you, and login.
Choose where this website will live, be in on your local machine or in a GitHub repo, and then run
> firebase init
This will create a few configuration files and a public/ folder,
with an index.html file inside it.
Simply smash the following into an AI and ask it to fill in the
placeholders with details about your own app, then replace the contents
of index.html with it. You can also host social sharing images
if you like – simply ask the AI how to add them.
<!DOCTYPE html>
<html>
  <head>
    <meta charset="utf-8">
    <meta name="viewport" content="width=device-width, initial-scale=1">
    <title>Your App Name - Redirecting...</title>

    <!-- SEO Meta Tags -->
    <meta name="description" content="Your app description here - explain what your app does">

    <!-- Open Graph Meta Tags (used by Facebook, LinkedIn, WhatsApp, and fallback for Twitter/X) -->
    <meta property="og:type" content="website">
    <meta property="og:title" content="Your App Name - Your App Tagline">
    <meta property="og:description" content="Your app description here - explain what your app does in more detail">
    <meta property="og:image" content="https://your-project-id.web.app/og-image.png">
    <meta property="og:image:width" content="1200">
    <meta property="og:image:height" content="630">
    <meta property="og:url" content="https://your-project-id.web.app">
    <meta property="og:site_name" content="Your App Name">

    <!-- Twitter/X Card Meta Tags (minimal - uses OG tags as fallback) -->
    <meta name="twitter:card" content="summary_large_image">
    <meta name="twitter:site" content="@yourtwitterhandle">

    <style>
      body {
        background: #f5f5f5;
        color: #333;
        font-family: -apple-system, BlinkMacSystemFont, 'Segoe UI', Roboto, Helvetica, Arial, sans-serif;
        margin: 0;
        padding: 0;
        display: flex;
        justify-content: center;
        align-items: center;
        min-height: 100vh;
      }

      .container {
        text-align: center;
        padding: 20px;
      }

      h1 {
        font-size: 24px;
        margin-bottom: 10px;
        font-weight: 600;
      }

      p {
        font-size: 16px;
        color: #666;
        margin-bottom: 20px;
      }

      .spinner {
        border: 3px solid #f3f3f3;
        border-top: 3px solid #3498db;
        border-radius: 50%;
        width: 40px;
        height: 40px;
        animation: spin 1s linear infinite;
        margin: 20px auto;
      }

      @keyframes spin {
        0% { transform: rotate(0deg); }
        100% { transform: rotate(360deg); }
      }

      .manual-link {
        margin-top: 30px;
        font-size: 14px;
        color: #999;
      }

      .manual-link a {
        color: #3498db;
        text-decoration: none;
      }

      .manual-link a:hover {
        text-decoration: underline;
      }
    </style>
  </head>
  <body>
    <div class="container">
      <h1>Your App Name</h1>
      <p>Redirecting you to the right place...</p>
      <div class="spinner"></div>
      <div class="manual-link">
        Not redirecting? <a href="#" id="manual-redirect">Click here</a>
      </div>
    </div>

    <script>
      (function() {
        // Get the current path for deep linking
        const currentPath = window.location.pathname + window.location.search + window.location.hash;

        // Deep link schemes
        const APP_SCHEME = 'yourappscheme://'; // TODO: Replace with your actual app scheme
        const IOS_UNIVERSAL_LINK = 'https://your-project-id.web.app'; // Your universal link domain

        // Store URLs
        const APP_STORE_URL = 'https://apps.apple.com/us/app/your-app-name/id[YOUR_APP_ID]'; // TODO: Replace with actual App Store ID
        const PLAY_STORE_URL = 'https://play.google.com/store/apps/details?id=com.yourcompany.yourapp'; // TODO: Replace with your app package name
        const WEBSITE_URL = 'https://your-website.com/'; // TODO: Replace with your website URL

        function detectPlatform() {
          const userAgent = navigator.userAgent || navigator.vendor || window.opera;

          // iOS detection
          if (/iPad|iPhone|iPod/.test(userAgent) && !window.MSStream) {
            return 'ios';
          }

          // Android detection
          if (/android/i.test(userAgent)) {
            return 'android';
          }

          // Default to web
          return 'web';
        }

        function attemptAppRedirect() {
          const platform = detectPlatform();

          if (platform === 'ios' || platform === 'android') {
            // First, try to open the app with the deep link
            const deepLink = APP_SCHEME + currentPath.substring(1); // Remove leading slash

            // Create a hidden iframe to attempt app launch
            const iframe = document.createElement('iframe');
            iframe.style.display = 'none';
            iframe.src = deepLink;
            document.body.appendChild(iframe);

            // Set a timeout to redirect to store if app doesn't open
            setTimeout(function() {
              // If we're still on this page, the app didn't open
              if (document.hidden || document.webkitHidden) {
                // App opened successfully, do nothing
                return;
              }

              // Redirect to appropriate store
              if (platform === 'ios') {
                window.location.href = APP_STORE_URL;
              } else {
                window.location.href = PLAY_STORE_URL;
              }
            }, 2500);

            // Clean up iframe after attempt
            setTimeout(function() {
              if (iframe.parentNode) {
                iframe.parentNode.removeChild(iframe);
              }
            }, 3000);
          } else {
            // Desktop/web - redirect to website
            window.location.href = WEBSITE_URL;
          }
        }

        function redirect() {
          attemptAppRedirect();
        }

        // Set up manual redirect link
        document.getElementById('manual-redirect').addEventListener('click', function(e) {
          e.preventDefault();
          redirect();
        });

        // Auto-redirect after a short delay to show the loading state
        setTimeout(redirect, 1500);
      })();
    </script>
  </body>
</html>
Note what this code does: it checks the device type of the user and redirects them to the correct app store, or to a fallback website if that doesn't work. This approach isn't bulletproof, but is surprisingly effective given its simplicity.
Next, you need two configuration files, one for iOS and one for Android.
Create a folder and call it .well-known/. Then create two
files inside it:
public/
├── index.html
└── .well-known/
    ├── apple-app-site-association
    └── assetlinks.json
In the
apple-app-site-association file, paste the following code,
replacing the placeholders with your own app details:
{
  "applinks": {
    "apps": [],
    "details": [
      {
        "appIDs": [
          "TEAM_ID.com.yourcompany.yourapp"
        ],
        "paths": [
          "*"
        ],
        "components": [
          {
            "/": "/*"
          }
        ]
      }
    ]
  },
  "webcredentials": {
    "apps": [
      "TEAM_ID.com.yourcompany.yourapp"
    ]
  }
}
Note that the TEAM_ID is your Apple Developer Team ID, which
you can find in your Apple Developer account dashboard under "Membership",
and com.yourcompany.yourapp is your app's bundle identifier,
which you can find in FlutterFlow.
In the assetlinks.json file, paste the following code, replacing
the bundle ID placeholder. For the SHA256 fingerprint, we'll return to this
momentarily.
[{
  "relation": ["delegate_permission/common.handle_all_urls"],
  "target": {
    "namespace": "android_app",
    "package_name": "com.yourcompany.yourapp",
    "sha256_cert_fingerprints":
    ["<WE'LL FILL THIS IN LATER>"]
  }
}]
Now deploy with
> firebase deploy.web.app URL based on your
project ID. When you visit, it'll redirect you, but you can also visit the
configuration files directly to check they're working:
https://[your-project-id].web.app/.well-known/apple-app-site-association
What to do in FlutterFlow
FlutterFlow allows us to modify configuration files, and there are two we must edit to point to the webpages we just deployed.
The first is Runner.entitlements, which you can find in the
Custom Code section in FlutterFlow. Add a new Entitlement and paste in the following, replacing the placeholder with your own project
ID.
<key>com.apple.developer.associated-domains</key>
<array>
  <string>applinks:[your-project-id].web.app</string>
</array>
That takes care of iOS, and for Android, it's the AndroidManifest.xml file. Create an Activity Tag using the plus button at the
top right, and paste in this code, again replacing [your-project-id].web.app with whatever your Firebase Hosted URL is (no need to add "https").
<intent-filter android:autoVerify="true">
    <action android:name="android.intent.action.VIEW" />
    <category android:name="android.intent.category.DEFAULT" />
    <category android:name="android.intent.category.BROWSABLE" />
    <data android:scheme="http" android:host="[your-project-id].web.app" />
    <data android:scheme="https" />
</intent-filter>
Getting the SHA256 Fingerprint
We're still missing the SHA256 fingerprint for the Android configuration
file assetlinks.json. Actually we need two – one for local
development and one for production.
The production key can be found in the Play Store, under
Test and release > App Integrity > App signing > SHA-256 certificate fingerprintThis assumes that your app has been uploaded to the Play Store, at least in draft status.
It's also a good idea to have a locally generated SHA-256 key so you can test the deep linking before deployment, and for this, we'll need the APK.
Running the app locally
I won't get into code downloading from FlutterFlow or local run instructions here, but you may use the FlutterFlow desktop app or vscode to get it going – there are plenty of guides for doing this online. In this case, we're looking for the SHA-256 key.
Once you have the code downloaded, open a terminal and navigate to the folder containing your code. Then run
> flutter build apk --releaseOnce the build is complete, drag the file into the terminal and run this command:
keytool -printcert -jarfile '/path/to/your/apk-file.apk'
If you don't have the keytool command installed, use the AI to
help you install it on your machine.
This will output a bunch of information, but what you're looking for is:
Certificate fingerprints:
  SHA1: CD:D3:8A:6F:C4:D2:F3:1E:73:76:D6:03:72:3G:2C:C1:98:5F:59:37
  SHA256: 32:99:15:39:C6:84:23:AC:this-is-just-an-example:E4C3:CD:DB:18:33:EB:79:B7:A9:F1
Now copy the SHA256 fingerprint, along with the production one from the
Play Store, into the
assetlinks.json file, like so:
[{
  "relation": ["delegate_permission/common.handle_all_urls"],
  "target": {
    "namespace": "android_app",
    "package_name": "com.yourcompany.yourapp",
    "sha256_cert_fingerprints":
    ["32:99:15:39:C6:FC:62:ED:69:C3:CD:DB:18:33:EB:79:B7:A9:F1",   🢀 Local SHA-256
     "66:77:88:99:AA:BB:CC:D9AA:BB:CC:DD:EE:FF:00:11:22:33:44"]    🢀 Play store SHA-256
  }
}]
Adding the Associated Domains for iOS
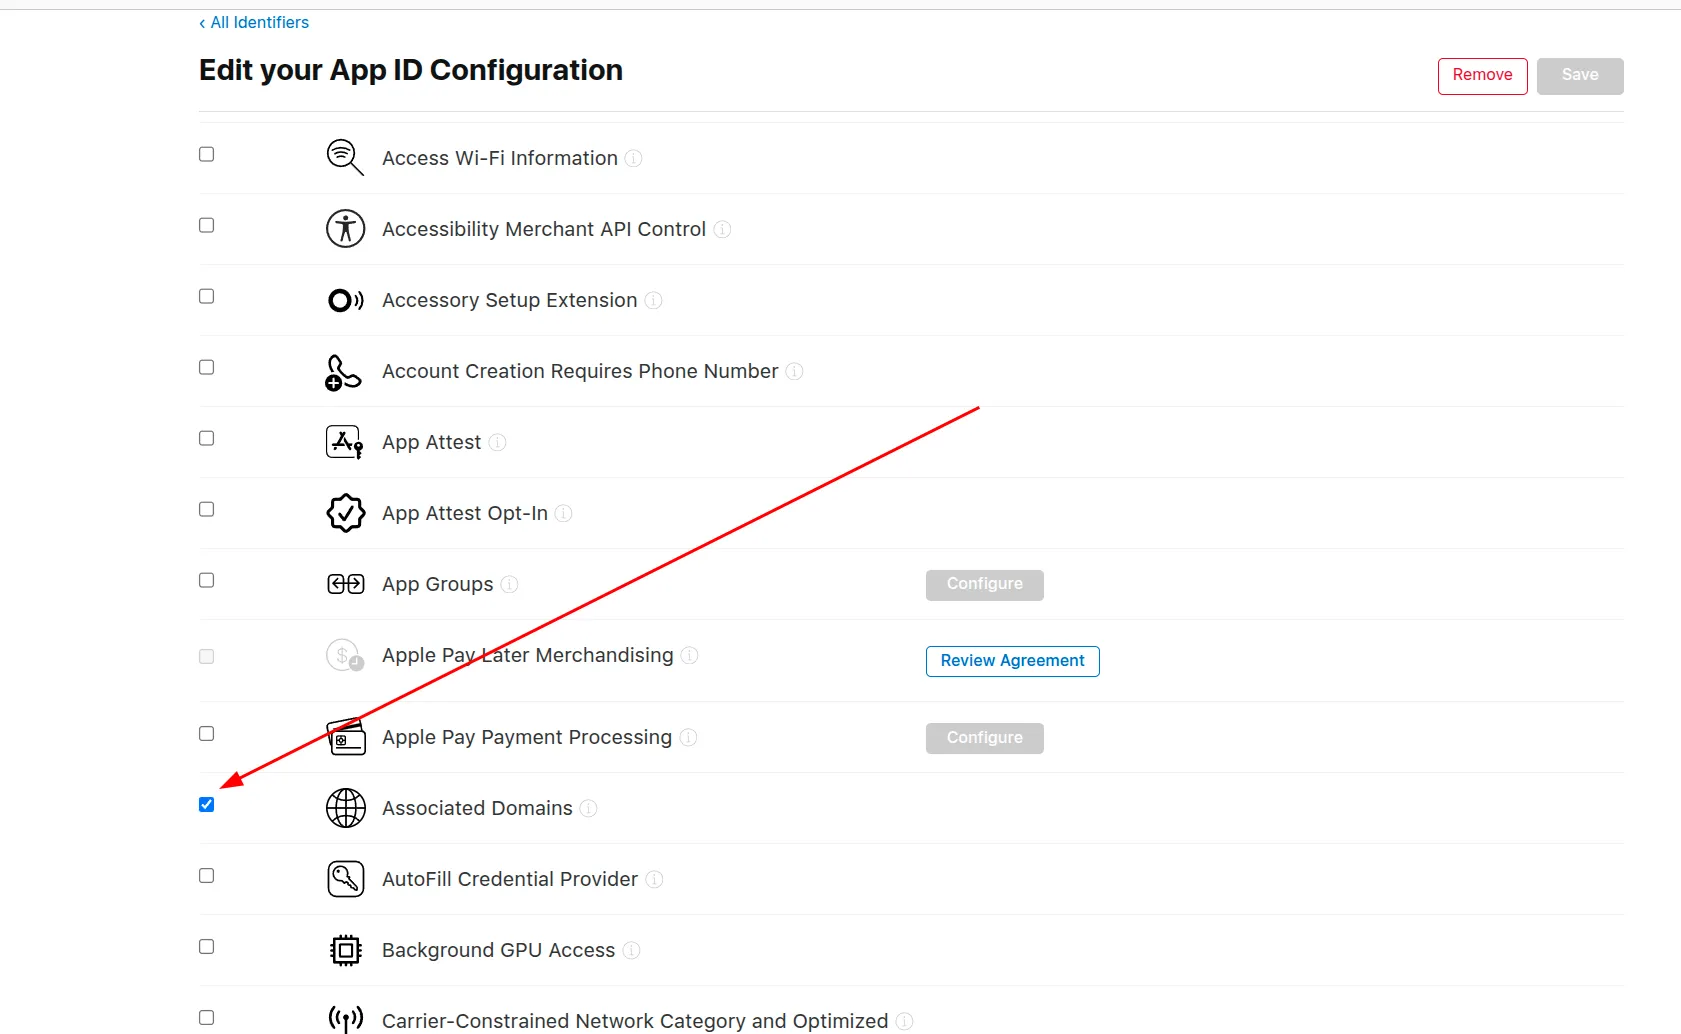
Apple requires one more step to have the deep links work on iOS. Go to the Apple Developer Dashboard, and navigate to "Certificates, IDs & Profiles", then "Identifiers". Find your app's identifier, the one in which you checked the boxes for Signin with Apple and Push Notifications. Find "Associated Domains" and check this box, then save this.
You'll need to redeploy the app to testflight to test this change.
Final steps and testing
Now that the SHA-256 keys are in place, redeploy the webpages to Firebase Hosting with
> firebase deploy.web.app
link. Try first without the app installed, the link should navigate to the
Play Store or App Store. Then install the app, and try again. The app should
open.
In FlutterFlow, the names you've allocated to your screens are the ones you'll use as the route, and page parameters will be passed as query strings. For example, if you have a screen called "Shopping", with a parameter called "purchaseId", the deep link to open that screen with a purchaseId of 123 would be:
https://your-project-id.web.app/Shopping?purchaseId=123Note that when passing the deep link, it's actually case sensitive, and uses the screen's name, not its route.
You can use a link shortener if you don't like how this is formatted, or you can set up a backend service that generates alias links for you.
And that's it. 💪
Remember, you'll need to test on a simulator or real device (test mode
will not work), and the deep link must be tapped on – you cannot visit
it in a browser. On an iOS device, the link will take you to the
installed app or the App Store, on Android it'll take you to the app or
the Play Store, and on web it'll redirect to whichever website you've
set in index.html.
Need further guidance?
If you need help with any aspect of your mobile application development, maybe I can help. Simply follow the link to find out more.
- Expert guidance
- Learning materials
- Consulting hours